Expanding your OpenWRT router
by kacang bawang
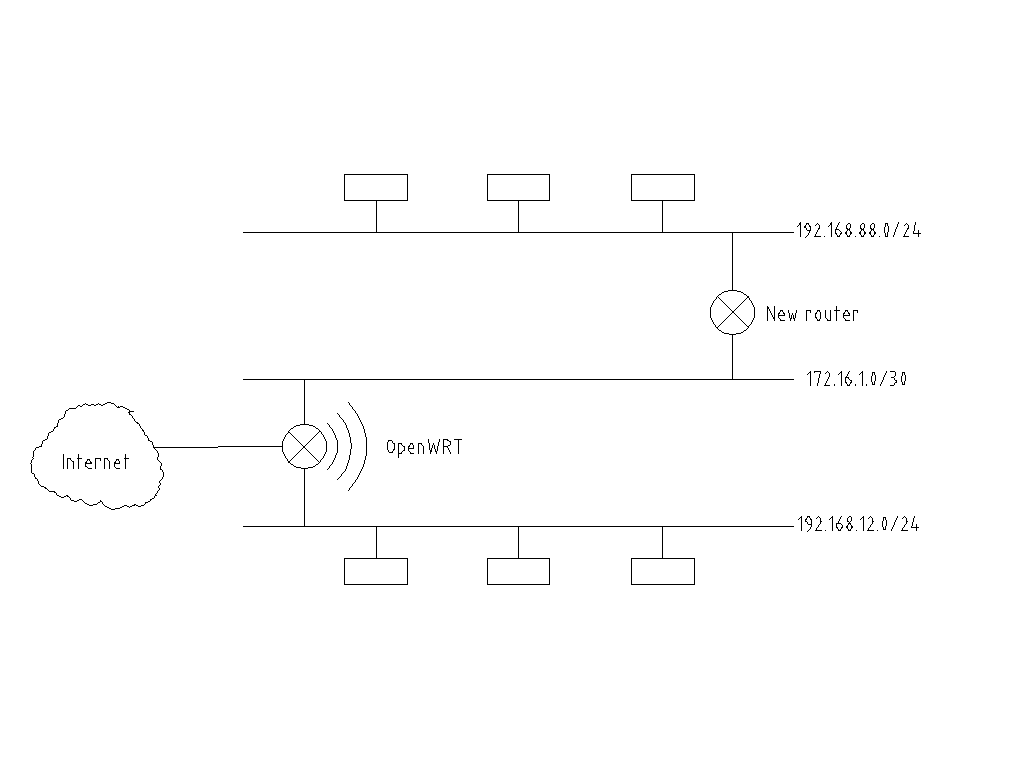
network diagram
This post is about how to add a second router to your existing OpenWRT setup.
It has been a while since I’ve written anything. Life starts to get more and more in the way as one grows older…
Say you have your router all set up, but one day you want to add some PoE devices to your network. Like an ntp-clock or a camera. Or maybe the ports are just running low. Hub, you say? No siree. What we need is another router. By the way, I still want the OpenWRT to serve DHCP and DNS across this new router.
So what do we want? Free beer! A route between the two, ahem, routers and a way to forward DNS and DHCP requests. This way every machine that comes online automatically gets a hostname that is known across the home network.
We will create a virtual interface (a software network card) which will be used to route traffic based on its destination. It will either be sent further down to the second router, or delivered directly, locally.
My new router is a hEX from Mikrotik, btw. 5ports, PoE and spf for a reasonable price. (I had bought it in an attempt to ditch the providers GPON box, but that’s another story).
Let’s create the required network interfaces:
|
1 2 3 4 5 6 7 8 9 10 11 12 13 14 15 16 17 18 19 20 21 22 23 24 25 26 27 28 29 30 31 32 33 34 35 36 37 |
/etc/config/network #the LAN ports on the router (minus one) config interface 'lan' option ifname 'eth0.3' #the naming follows the VLAN number given below option force_link '1' option proto 'static' option ipaddr '192.168.12.1' option netmask '255.255.255.0' option ipv6 '0' #the port that leads to the other router config interface 'backbone' option ifname 'eth0.4' option force_link '1' option proto 'static' option ipaddr '172.16.1.1' option netmask '255.255.255.252' option ipv6 '0' #enable the VLAN functionality config switch option name 'switch0' option reset '1' option enable_vlan '1' #lan config switch_vlan #you don't need to give a name like eth0_3 here option device 'switch0' option vlan '3' option ports '2 3 5 6t' #a port that appears in more than one VLAN needs to be tagged #backbone config switch_vlan option device 'switch0' option vlan '4' option ports '4 6t' |
If before, you had eth0 getting an IP address, it will no longer do so due to being involved in a VLAN. Now, the interfaces that will get IP addresses will be of the form eth0.x, where x is the vlan number. Nevertheless, eth0 will still be shown in the output of ifconfig.
Above, we split off one of the lan ports into its own interface, ie ip-address, which can then be used to forward traffic to the remote subnet. As opposed to carbon-copying all the local traffic to the remote subnet regardless of whether its target is on the remote subnet or not (this is what a simple hub would do).
Another note, you need to know which plug on the router corresponds to which port number. This is available on the OpenWRT model wiki page. Here’s mine. You can also map the ports by hand by plugging and unplugging cables and checking the output of this command swconfig dev switch0 show | grep port
|
1 2 3 4 5 6 7 8 9 10 11 12 13 14 15 16 |
############################################### # # Port config # # Archer-C7 # # Port Plug/Device # 0 eth1 # 1 WAN # 2 LAN1 # 3 LAN2 # 4 LAN3 # 5 LAN4 # 6 eth0 # ############################################### |
And let’s add a route to the new subnet. Thus, all traffic meant for 192.168.88.x will go via the 172.16.1.2 gateway (backbone remote), which is reachable via the 172.16.1.1 interface (backbone local).
|
1 2 3 4 5 |
config 'route' 'backbone' option 'interface' 'backbone' option 'target' '192.168.88.0' option 'netmask' '255.255.255.0' option 'gateway' '172.16.1.2' |
Now we need to do the same thing on the mikrotik:
|
1 2 3 4 5 6 7 8 9 |
/ip address #this will be the backbone link add address=172.16.1.2/30 interface=ether1 #this will be the mikrotik's address on the its local lan add address=192.168.3.1/24 interface=ether2 #send all other outbound traffic through here /ip route add gateway=172.16.1.1 |
Note: I had to disable ICMP redirect on the mikrotik in order for the routing to work correctly.
On the OpenWRT, since the link is through a different interface (eth0.3 vs eth0.4) we need to take care of the forwarding rules. This is done via firewall configuration. We could set up something more complicated, but for the purposes of this article I will simply add the link to the “trusted” lan zone.
|
1 2 3 4 5 6 7 8 9 10 11 12 13 14 |
/etc/config/firewall config zone option name 'trusted_zone' list network 'lan' list network 'backbone' option input 'ACCEPT' option output 'ACCEPT' option forward 'ACCEPT' config forwarding option src 'trusted_zone' option dest 'trusted_zone' |
On the Mikrotik I will cheat a little bit and just bridge its ports together. Sorry 🙂 If you want to contribute an update, I will gladly incorporate it.
|
1 2 |
#ether1 is the "WAN" port /bridge ports -> Add ether1 #don't remember the exact console command for this |
At this point you should be able to plug into the Mikrotik with a manually assigned ip address (from the 192.168.88.0/24 subnet) and be able to reach the OpenWRT box. Note that the backbone does not show up in the traceroute. Wireshark is indespenceable for debugging if things are not working.
|
1 2 3 4 |
$ traceroute 192.168.12.1 traceroute to 192.168.12.1 (192.168.12.1), 64 hops max 1 192.168.88.1 0.350ms 0.210ms 0.192ms 2 192.168.12.1 0.523ms 0.281ms 0.260ms |
One of the things I love about running OpenWRT is doing dhcp-dns combination. New device comes onto the network and automatically gets a hostname. Very nice. How can we keep this going with two routers on the network now? If we run DHCP on the mikrotik, openwrt will not know about those leases and will not be able to assign a hostname.
To remedy this predicament, we will use a feature call DCHP Relay. The DHCP request, which is by its nature link-local, needs to be forwarded across network segments to the designated DHCP server. Let us specify how this is to be done.
OpenWRT:
|
1 2 3 4 |
/etc/dnsmasq.conf #dhcp relay dhcp-range=set:eth0.2,192.168.88.150,192.168.88.199,255.255.255.0,1h |
Mikrotik:
|
1 2 |
/ip dhcp-relay add name=dhcp-relay interface=bridge \ dhcp-server=192.168.12.1 local-address=192.168.88.1 disabled=no |
Note that we are not going the usual route to specify dhcp configs via /etc/config/dhcp, as the latter does not allow us to specify a dhcp-range without binding it to an interface. (This interface exists, except it is on the Mikrotik). Thus we feed it directly to dnsmasq, bypassing the openwrt configuration engine.
Watch outs:
– Make sure dnsmasq starts (and does not crash because of config syntax errors). Use ps to check
– Make sure the options are read. In the ps output you will see the path to the generated openwrt config file (/var/etc/dnsmasq.conf….), but our edits will not show up there. You have to look in the log (/var/log/messages) for signs of activity.
|
1 |
Fri Jul 12 16:24:13 2019 daemon.info dnsmasq-dhcp[10413]: DHCP, IP range 192.168.88.150 -- 192.168.88.199, lease time |
– There will be a warning message in the log that reads ‘no address range available for DHCP request via eth0.3’. It is referring to the interface-less range that we just added entered. Despite it, the functionality does not seem to be affected so I guess we will just disregard the message.
|
1 |
.warn dnsmasq-dhcp[889]: no address range available for DHCP request via eth0.3 |
– The DHCP server on the mikrotik should obviously be off
With this, the setup should be complete. If things are not going according to plan, debug with wireshark.
UPDATE.
It is important to specify the following in /etc/dnsmasq.conf, otherwise dns leases become flaky and sometimes issue and sometimes don’t. This fixes it.
|
1 2 3 4 |
interface=eth0.3 interface=eth0.4 interface=wlan0 except-interface=wan |